Lindy rigging is an excellent technique for catching walleye. You don’t have to buy those pre-packaged rigs selling for $2-$3 either. By purchasing a few “ingredients” and following these simple steps you can customize your own rigs for much less.
Here’s what you’ll need to get started:

Sharp size 6 octopus hooks – you will need (2) hooks per rig (I prefer Gamakatsu)
Monofilament or fluorocarbon line – 3′ per rig (I’ve had success with Berkeley Vanish 8-10 lb. test)
Beads of choice – figure (8) small 5mm size beads or (6) medium 6mm size beads per rig (my favorite colors are yellow, chartreuse, white, & red)
Medium size Quick Change Clevices w/ keeper – (1) per rig (colors are usually limited – white clevice in picture)
Barrell swivels size 7 or 8 – (1) per rig
Duolock snaps size 2 – (1) per rig (these snaps are tied to the line on your rod and will connect your finished lindy rig)
Spinning blades size 3 or 4 – (1) per rig (I use Indiana or Colorado shaped blades)
Sinkers 3/8 oz. – (1) per rig (I like tear drop or egg sinkers)
You can usually find some of these items at your local sporting goods store, but selection greatly increases when you start looking online or in the lure building sections at Cabela’s or Bass Pro. If you can’t find a particular size or color, don’t worry about it. Go with the next best option and you’ll be fine.
When trying to plan for the number of rigs to tie, it helps to determine what kind of fisherman you are. Some people only use lindy rigs sparingly and some use them the entire week. As a guest, I usually tied about 15-20 of them for my week. That’s a good number to get you started with good selection and a few backups. Once you get the hang of tying them, it’s easy to pack the supplies in your tackle box and spend a few minutes tying a couple extra rigs of the hot color that your fishing partner was using all day.
Step 1
Cut a length of line approximately 3′ long.
Step 2
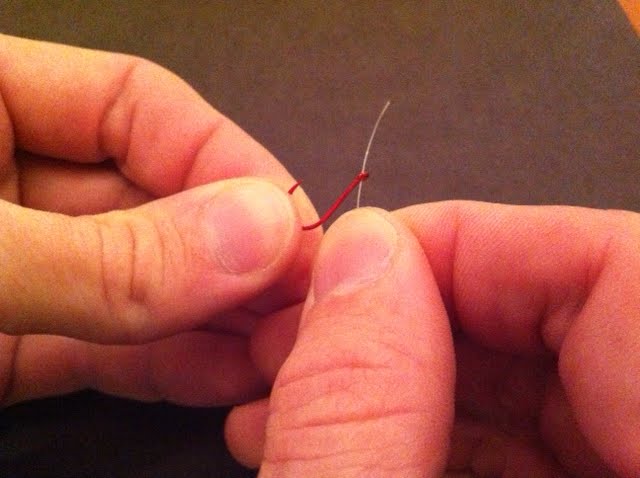
Tie one of your hooks on the end of the line – start by standing the hook upright. Insert the line “down” through the eye and pinch along the straight part of the hook shaft.

Wrap the line 7-8 times around the hook shaft over the pinched line. Now run the free end of the line “up” through the eye of the hook again. Moisten the line carefully (don’t give yourself any unwanted lip piercings), cinch the knot, & trim excess line below knot.

To recap – the line went down through the eye of the hook, wrapped around the line, and then the free end of the line went back up through the eye (with the hook standing upright).
Step 3
Tie the 2nd hook on the line about 2″ above the first hook or nearly the length of your pinkie finger. Run the line “up” through the eye of the 2nd hook until the hook is in position.
Now pinching the line against the hook again, wrap the line 7-8 times around the hook, and run the free end of the line “up” through the eye again. Moisten & cinch.
To recap – the line went up through the eye of the hook both times while tying the 2nd hook.
Step 4
Now it’s time to choose your bead colors. Put yourself in the scales of a walleye and picture what color food you’d like to eat. I end up with a pretty steady assortment of white, yellows, & reds, but of course my sister will always catch a monster with some hideous combination of pink, purple, & glow-in-the-dark blue so don’t get bogged down here. This is part of the fun – finding your own variation that will outfish everyone else.
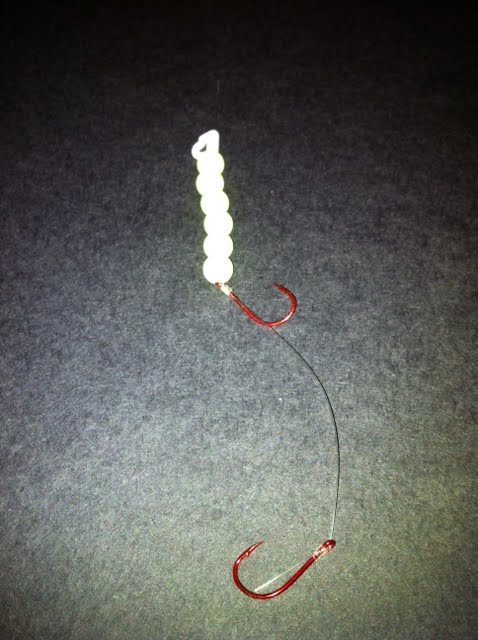
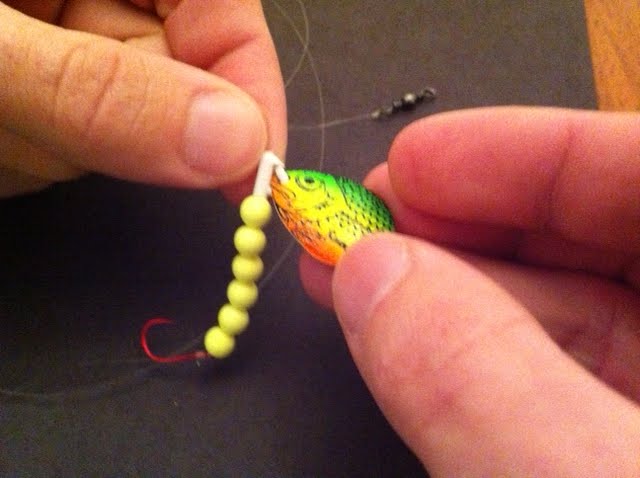
Step 5
Add your clevice. Make sure you have the correct side up where the spoon or spinner will snap in.
Step 6
Tie a swivel on the other end of the line using your favorite fishing knot.
 Step 7
Congratulations! Your rig is ready for action. For your final preparation you will tie a duolock snap on the line on your rod. You attach the swivel to this as well as a sinker. I carry sinker sizes between 1/4 ounce – 1/2 ounce, but most often use a 3/8 ounce tear drop or egg sinker. Snap your spinning blade onto the clevice. Make sure the curve of the blade bends in toward the rig. Select your favorite live bait or try Berkley Gulp and thread onto the hooks and you’re ready to fish! Note…if you prefer fishing minnows or shorter baits then you will want to reduce the distance between the two hooks or even try a single hook.
In a few days, I’ll follow up with another post detailing how to fish lindy rigs. In the meantime, post your comments or questions below. There are several variations for tying these rigs so if you have a method that works well please share!
I was low on Lindy components so I went to a bunch of sporting goods stores and couldn’t get all of parts at one place. It might be because I am in Arizona, but I would recommend purchasing the parts online. Cabelas, BassPro, and Jann’s Netcraft have all of the components. Right now, my online cart at Cabelas is filling up.
I use this tying method and it works great. I don’t think i have ever lost a fish because the lindy rig came untied. This method of tying is efficient because when the fish get on the line it tightens your lindy rig more and the two hook system works great in keeping fish on. I go to Cabelas for my supplies but you can find them just about anywhere.
Great stuff, I also find the Cabelas has more to offer when it comes to these components.